Welcome

Welcome to Kay's Village Recipes! Some believe the heart of the home is in the kitchen, I believe the kitchen is the heart of the village. It takes a “village” to live life to its fullest and it has nothing to do with geography or how large or small a town you live in. My “village” is inhabited by family members, dear friends, co-workers, and the occasional visitor who is in my life for a short period of time. Each one of these people has a profound impact on my emotional wellbeing as well as the quality of my life, and all have one thing in common…they all love to eat, and I love to cook for them.
On this blog you will find free, family recipes for: homemade soups, breads, apple pie, cakes, candies, snacks, casseroles, main courses, side dishes, appetizers, breakfast, home-style cooking, and so much more.

Thursday, June 30, 2011

How to Brew a Perfect Cup of Tea

Original Recipe from:  Kay Johnson-Tomblin

To know me is to know that I love hot tea.  I was raised to drink tea, and never developed a taste for coffee.  To me there is something so civilized in the ritual of tea.  The very process is calming and balancing.  It must be the strong English heritage showing through in me, but whatever it is; I know that I cherish my tea time.  Whether you are brewing an herbal tea or a black pekoe tea, the steps are the same.  Tea is also good for you!  It’s a natural diuretic, and is full of antioxidants. 

The ladies in my family often had tea together around the dining room table or served in the living room.  Those times were always special to me growing up.  The topic of the day didn’t matter, it was the time together, and it was the bonding that took place over those cups of tea.  The memories of those tea times warm my heart to this day, especially when I get out Mom’s porcelain tea cups!  Bond with your girl friends or female family members today over a cup of tea….I know you will make warm memories of your own.  Enjoy!


Instructions

1)  Start with a preheated pot or cup so that your boiling water doesn’t drop below perfect brewing temperatures.  To preheat:  fill your teapot or cup with very hot water and let it stand for a moment. 

2)  Use cold, fresh water from your tap or bottle.  If you have poor or hard water quality, use bottled or filtered water.  Let the water run for a minute until it gets very cold, this ensures that the water is aerated (full of oxygen) which will release the full flavor of the tea leaves.


3)  Bring the water to a rolling boil.  Don’t let it boil too long as it will boil away some of the flavor releasing oxygen and result in a flat tasting cup of tea.  I have found electric water kettles to be the best for reaching a full boil and shuts off automatically at the optimum boil.  They also reach boiling temperature quickly.  Pour boiling water on tea leaves or tea bag.  Note:  I use 3 tea bags per pot of tea.


4)  Brew 3-5 minutes to taste.

5)  Serve with lemon slices, sugar, and/or cream (milk).

Ho much loose tea should I use to make a cup of tea?

White Tea:          2 teaspoons
Green Tea:        1 teaspoon
Oolong Tea       2 teaspoons
Black Tea           1 teaspoon
Herbal Tea        Start with 1 teaspoon and increase to desired taste

Wednesday, June 29, 2011

Sweet Dill Pickles

Original Recipe from:  Lucy Griffin-Bowers

You don’t have to be skilled at canning to make these pickles.  Grandma always had a jar of Sweet Dill Pickles in her refrigerator.  They were a staple in her kitchen.  Grandma always served pickles and relishes at every meal.  To her the table wasn’t properly set if the relish tray was missing.  Judging from her recipes, she loved variety when it came to pickles.  Of course in her younger years she canned everything she could from her garden to enjoy throughout the year.  If you’ve never made pickles before, I recommend starting with this recipe and then branch out to more complicated recipes.  Enjoy!

Ingredients

1 quart Dill Pickles (whole), sliced and drained
1 onion, sliced
2 cups Sugar
2 tablespoons White Vinegar

Directions

Combine all ingredients and mix well.  Put back into the jar and let set over night before serving.  Keep refrigerated. 

Tuesday, June 28, 2011

Hot Dog Topping

Original Recipe from:  Bonnie Williamson-Tomblin

This is a great topping for Coney-style Hot Dogs.  Make your favorite brand of hot dogs, boiled or grilled, then top with this sauce, sprinkle some grated cheese, add some mustard and ketchup and you’ve got a fabulous hot dog!  Bonnie is originally from West Virginia and is very good at home-style cook.  Her recipes are always easy, tasty, and budget friendly.  She and her husband have a large family and even larger hearts.  Family meal time is always a joyous event in their home.  Try this recipe for your next barbeque or family get-together.  En joy!

Ingredients

1-1/4 pounds lean Ground Beef
1 tablespoon + 1 teaspoon Chile Powder
3-8 ounce cans (24 ounces total) Tomato Sauce
1 dash of Hot Sauce
1 tablespoon Salt

Directions

Brown ground beef in a heavy skillet.  Drain off the grease.  Add all remaining ingredients, bring to a boil then reduce to a simmer.  Stir with a potato masher to blend well.  Simmer for 1 hour or until thick.  Do not over cook.

Note:  I have cut this recipe in half from the original recipe Bonnie share with me years ago.  Left overs freeze very well for use in the future. 

Monday, June 27, 2011

State Fair Corn Dogs

Original Recipe from:  Michigan State Fair

Who doesn’t love a Corn Dog?  There is something so special about a local fair, the sights, the sounds…and the Food.  Foods that just say summer.  Frozen corn dogs, available at the grocery, just don’t capture the real flavor and they are loaded with ingredients that just aren’t needed.  This recipe was published in the Detroit Free Press back in the 1960’s.  They taste just like the ones you get at the State Fair.  My kids always come home when I tell them I’m making Corn Dogs.  We have fun, the mood is always festive, and the Corn Dogs disappear!  Make up a batch of these and just taste summer, even in the middle of winter.  All time family favorite!   Enjoy!

Notes: 
We made our own skewers using 1/8” dowel rods.  Cut dowel rods in 12 inches lengths, and then sharpen one end (a pencil sharpener works well).  Dowel rods are available at craft and hardware stores.  You can also use metal skewers. 

I use an asparagus pan for frying the Corn Dogs.  An asparagus pan is 5.5“diameter, 8” deep, it is a perfect depth for frying Corn Dogs, and makes great asparagus too. 


Ingredients


1 cup self-rising flour
¾ cup self-rising corn meal
1/2 teaspoon salt
1 cup milk
1 teaspoon dry mustard
1 egg

Hot Dogs (as written, the recipes makes 8-10 corn dogs) Note:  DO NOT use hot dogs that plump when you cook them!

Directions

Sunday, June 26, 2011

Grandma’s Raspberry Bars

Original Recipe from:  Lucy Griffin-Bowers

The original name of this recipe was “Mary’s Apricot Bars”, but I’ve taken the liberty of changing it.    I have no idea who Mary was, or how my grandma came by this recipe, but I’ve always thought of it as hers.  Since I am not a fan of apricots my grandma made them for me with raspberries instead.  My grandma was like that, if you didn’t like an ingredient, she would change it.  This recipe will work with any kind of preserves.  Try it with your favorite flavor and make it your own.  My granddaughter and I made these bars together and had the best time, check out the story here.  Enjoy!


Crust

2 cups Flour
1/4 teaspoon Salt
1 cup Butter or Margarine
1/2 cup Powdered Sugar

Mix and press into a greased 9x13x2 inch baking pan.  Bake in 350 degree oven for 12-15 minutes.

Filling

1 small jar Raspberry Preserves

Spread over hot crust when you remove it from the oven. 


Topping

1 Egg
1 cup Sugar
4 tablespoons Butter, melted
2 cups grated Coconut
1/2 cups chopped Nuts (Grandma used Walnuts)

Mix together and spread over the Raspberry layer.  Return to the oven for 20-25 minutes or until golden brown. 


Cool and cut in small squares. 

Friday, June 24, 2011

Roasted Corn Salsa

Original Recipe from:  Jason Maxlow

This recipe comes from blog follower Jason Maxlow.  I met Jason earlier this year shortly after starting this blog.  When he forwarded this recipe I thought it would make an excellent entry for a new section of Kay’s Village Recipes…The Grilling and Smoking Section.  We all have wonderful memories of summer meals made on a grill.  Friends and family gathering on the patio or at the park sharing good times topped off with a great meal.  This salsa is perfect for a barbeque.  Serve it with some fresh tortilla chips and….Enjoy!

Ingredients and Directions

4 ears of Sweet Corn, husk on.  Seared on all sides until the husk is blackened.  About 5- 8 minutes per side.  Cool, remove husk and chop.
4 Peppers (red, yellow, green – whatever you prefer) seared until blackened.  Cool and peel the charred skin off and dice.
1 large Spanish onion, grilled until caramelized, diced
Chopped Cilantro to taste
Salt and Pepper to taste
2 Tomatoes, diced
Juice of 2 Limes
2Jalapenos, diced (or more to taste)

Mix in bowl, let marinate and feed.  Makes about a quart or so. 

Could do well with some Garlic, Roasted Garlic and/or diced Chipotles

Thursday, June 23, 2011

Spicy Ricey

Original Recipe from:  Lucy Griffin-Bowers

My grandma had the best names for her dishes…just wait until I get more of them posted and you will see what I mean.  I remember eating this dish when I was a young girl and loving it.  Since my mother worked full-time whenever Grandma would visit she would cook most of the family dinners.  This is a very easy recipe and tasty too.  Enjoy!

Ingredients

4-6 slices of Bacon
1 cup chopped Onion
1/4 cup minced Green Pepper
2 cans Tomato Soup
4 whole Cloves
1 Bay Leaf
1/4 cup Water
1/2 cup uncooked Rice


Directions

Cook Bacon until crisp in a large skillet.  Remove it from the pan and break it up into bits.  Add Onion and Green Pepper to the bacon drippings and let it simmer until soft and then add Bacon Bits and other ingredients; cover the skillet and let it cook slowly for 30 minutes, stirring occasionally.  When mixture is done remove the Cloves and Bay Leaf and serve while it’s hot.

Wednesday, June 22, 2011

Village Apple Pie

Original Recipe from:  Kay Johnson-Tomblin

Apple Pie is an All-American treat that everyone loves.  This recipe was shared with me over 30 years ago from a fellow firefighter’s wife.  Since that time, I have lost count of how many apple pies I have made.  Apple Pie is a must have for my family holiday dinners and this one is their favorite.  Make an apple pie for your family; it will put love in their souls and a smile on their faces.  Enjoy!


Ingredients

10-12 medium size apples; peeled and sliced.  (Note:  I use McIntosh Apples, but any good baking apple will work)
1 cup Sugar
1/4 cup Flour
1/2 teaspoon Cinnamon
2-3 pats of Butter
2 pie crusts (Note:  Make your own from scratch or use Pillsbury Pie Dough in the refrigerator section of your grocery)


Directions

Put one pie crust on the bottom of your pie pan.  Add sliced apples to the crust. 


In a medium mixing bowl combine the Sugar, Flour, and Cinnamon.  Mix well.  Pour this mixture over the sliced apples distributing evenly. Top with pats of Butter.  Cover with second Pie Crust.


Bake in 375 degree oven for 15 minutes.  Reduce oven temperature to 350 degrees and continue baking for 40-45 minutes.  Sprinkle pie crust with Cinnamon Sugar immediately after removing the pie from the oven. 

Tuesday, June 21, 2011

Blueberry Cobbler

Original Recipe from:  Virginia Bowers-Johnson

Not only did my mother made a fabulous Peach Cobbler, she also made this delicious Blueberry Cobbler.  Fresh blueberries are the star ingredients.  Mother always looked forward to blueberry season to make her best cobbler.  She only put it on the menu at the deli when they were in season.  She said it made the cobbler a more special treat for her customers.  Whether you only make this dish during the summer, or you make it year-round, I encourage you to give it a try.  I know you’re going to love it, I do!  Enjoy!!!!

Ingredients and Directions

4 cups fresh Blueberries
1/2 cup Sugar
1 tablespoon Cornstarch
1 teaspoon Lemon Juice

Preheat oven to 400 degrees.

In a large sauce pan blend the Sugar and Cornstarch.  Then add the Blueberries and Lemon Juice.  Cook over medium high heat, stirring constantly, until it thickens.  Then boil the mixture about one minute.  Pour into a 2 quart casserole dish.  Put the casserole dish into the oven to keep it hot.  Prepare the topping.

1 cup Flour
1/2 teaspoon Salt
3 tablespoons Shortening
1/2 cup Milk

Mix all ingredients.  Cut through Shortening six times and mix until it forms a ball.  Drop by spoonful on hot fruit. 

Cake 25-30 minutes or until golden brown.

Monday, June 20, 2011

Barbeque Beans

Original Recipe from:  Lucy Griffin-Bowers

I found this recipe in my grandma's hand-written recipe book from the 1950's.  Grandma always called her baked beans “Barbeque Beans”.  During the summer grilling season she would always bring her beans as her potluck dish.  They were my father’s favorite dish and she made them for him every time she visited us.  My father used to rave that no one made beans like Lucy.  I believe my mother was pretty smart, she wouldn’t make these beans for my dad; instead she kept them as a special treat her mother could make her husband when she cam to visit.  A great way to get a man excited to see his mother-in-law!  Of course Grandma always made a pan of corn bread too. 

While looking through Grandma's book, about 10 pages after this recipe, I found a note on what to add to baked beans to make them better.  I have included her note at the bottom of this recipe.  I don't know if grandma used this tip or not.  Make a batch either way or both ways and decide for yourself which you prefer.  Enjoy!

Ingredients

2 cups dried Navy Beans
6 cups Tomato Juice
3 teaspoons Salt
1/4 – 1/2 pound Salt Pork
1/3 cups old fashioned Dark Molasses
1 teaspoon Chili Powder
1 teaspoon Dry Mustard
1/4 teaspoon Black Pepper
1 tablespoon Worcestershire Sauce
I medium Onion, chopped fine
2 tablespoons Sugar (Grandma liked a good bit more sugar.  She used 1/2 – 1 cup Brown Sugar)

Directions

Wash the beans and let them soak overnight in 5 cups of Tomato Juice.  The next morning put the beans in a large pot.  Add the Salt, cover and simmer until beans are tender.  Do not let them boil. 

Pour the beans into a “Bean Pot” (or other oven-safe pot).  Wash and score the Salt Pork and press into the top of the beans.  Add all the other ingredients to the remaining 1 cup Tomato Juice and pour over the beans.  Cover Bean Pot and bake in a slow oven, 325 degrees, for 2 hours.  Then uncover the pot, lift the Salt Pork up to the top.  With the cover off, continue baking until the Salt Pork is brown, maybe another 30 minutes longer.

Tip:  Add 1/2 teaspoon Cinnamon to baked beans to each 2 cups of beans, makes them good. 

Saturday, June 11, 2011

Mexican Lasagna

Original Recipe from:  Kay Johnson-Tomblin

Years ago one of my coworkers brought in a Mexican Lasagna for an employee potluck event.  It was the tastiest dish there that day.  From that first bite I decided to figure out how she made it and try it out with my family.  At first they laughed…Mexican Lasagna…really Mom!  Then they tasted it.  Their laughter turned into complements.  It became a most requested dish by my kids after that first taste.  Try this dish for your family or your next potluck event.  It is very easy to make.  Enjoy!

Ingredients

1)  1 can Diced Tomatoes with Green Chilies
2)  2 cans 14.5 ounce Refried Beans
3)  1/2 Jar of Salsa (mild, medium or hot)
4)  4 ounces Taco Sauce
5)  1 1/2 pounds Ground Beef (cooked and drained)
6)  2-3 bags of shredded Cheese (Colby/Mexican blend)
7)   1 bag of Tortilla Shells (soft)

Directions

Use a 9x13x2 casserole or baking dish

1)  Mix items 1-5 together
2)  Start by putting a layer of the Mix on the bottom of your baking dish.
3)  Add a layer of Cheese
4)  Put 2 Tortilla shells on top of the Cheese
5)  Repeat Steps 1-4
6)  When you get to the top of the dish, make sure you have the Mixture on top and smother with Cheese.

Bake in 350 degree oven for 34-40 minutes.  

Friday, June 10, 2011

Iced Tea

Original Recipe from:  Kay Johnson-Tomblin

My Aunt Bernie taught me how to make iced tea when I was a young teenager.  She made the best iced tea I’ve ever tasted.  I never wrote down Aunt Bernie’s instructions and I know I make it just a little bit different than she did.  Being an avid tea drinker, I think iced tea is the perfect summer beverage.  It is a healthy alternative to sodas and juices, and is very refreshing.  If you prefer flavored teas, follow the instructions below using your favorite herbal or flavored tea bags. 

Boiled Iced Tea

Instructions for 2 Quarts (Half-Gallon)

8 cups Boiling Water
4-5 regular sized tea bags or 2 family sized tea bags
2 trays ice cubes

Bring water to a rolling boil, remove from heat.  Pour boiling water over the tea bags into a glass pitcher or carafe.  Brew tea for 5-10 minutes.

After tea is brewed, remove the tea bags and add ice cubes.  After ice has melted, add additional water (or ice) as needed, to fill your 64 ounce pitcher.  Store in the refrigerator.

Note:  This recipe is easily doubled or cut in half as needed.  Iced tea is best when it is fresh.  Do not make more than a 2-3 day supply as it tends to get a little bitter with age. 


Sun Tea

Place 6-8 regular sized tea bags or 3 family sized tea bags in a clean, gallon jar and fill with cold water.  Cap loosely and place in hot sunshine for 3-4 hours.  Remove tea bags and store in the refrigerator.

Thursday, June 9, 2011

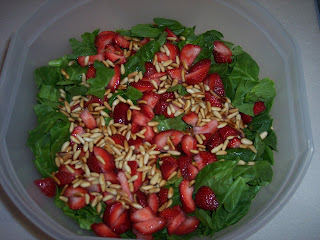
Village Spinach Salad with Strawberries

Original Recipe from:  Kay Johnson-Tomblin

This is a perfect summer salad.  Light, fresh and delicious….the best combination when the weather heats up.  I made this salad for a barbeque recently and The Village Taste Testers declared it the best ever!  Make one for your family this week and watch it disappear!  Enjoy!


Ingredients

10 ounces Baby Spinach, stems removed
2 cups sliced fresh Strawberries
1/2 cup Feta Cheese, crumbled
1.2 cup Toasted Pine Nuts
Raspberry Vinaigrette Dressing


Directions

Coat frying pan with non-stick cooking spray.  Pour pine nuts in the pan and toast over medium heat until golden brown.  Stir frequently while toasting.  Set aside.


Remove stem from Baby Spinach.  Tear into bite size pieces, rinse in colander and drain well.

Place Spinach in a large salad bowl.  Add Strawberries, Feta Cheese and Pine Nuts.  Toss with Raspberry Vinaigrette dressing right before serving. 


Serves 8

Wednesday, June 8, 2011

Daddy Mac

Original Recipe from:  John Ashbrook

John and Kim Ashbrook represent the Tennessee branch of my village.  Kim and my daughter went to middle school together.  The Ashbrooks are a typical young family…busy with work and kids and the stresses that go along with life in our times.  Additionally they live far away from their friends and family.  They impress me because they include their kids in almost everything they do…from volunteering at a local food bank to cooking and baking.  They know the meaning of family meal time and are teaching their boys the value of spending time together as a family. 

John often makes this meal when Kim is working.  He and the boys prepare the meal together and have a great time in the kitchen.  This recipe is John’s creation and I am honored to include it in Kay’s Village Recipes collection.  I hope you will make this dish with and for your family just like John does.  Enjoy!

Ingredients

2 cups Elbow Macaroni
1/4 cup Butter
1/2 cup Bread Crumbs
1 pound Ground Beef (plus seasonings)
2cups Milk
8 ounces shredded Colby Jack Cheese
8 ounces shredded Sharp Cheddar


Directions

Tuesday, June 7, 2011

Grandma’s Peanut Butter Pie

Original Recipe from:  Kim Ashbrook

This recipe is from Kim’s Grandma.  Like so many grandma’s her recipe wasn’t written in an easy to understand manner.  Kim learned how to make this pie at her grandma’s side and “just knew” how to make it.  Being a follower of this blog, inspired Kim to write the recipe out so that those not privileged enough to have her grandma teach them would be able to make this delicacy in their very own kitchen.  Do you have some family recipes that aren’t completely written out?  If so, the next time you make one of those dishes, write out the missing instructions or the “tweaks” you put on that recipe.  Then, share those recipes with your loved ones.  They will appreciate your efforts and love you all the more for it!  Enjoy!
Note from Kim:  This recipe calls for one 9 inch pie.  Grandma always made two due to the size of the family and she always made them for the holidays.  I have written this recipe for one pie, but it is very easy to double.


Ingredients and Instructions

Crust
9 inch pie crust.  Use your favorite crust from scratch or use refrigerated/frozen crust.  Just make sure the crust has been baked and cooled before making the rest of the pie.

Filling
1/4 cup Cornstarch
2/3 cup Sugar
1/4 teaspoon Salt
3 Egg Yolks (separate the whites and use for the meringue)
2 1/4 cups Milk
2 tablespoons softened Butter
1 teaspoon Vanilla

In a saucepan mix in dry ingredients with a whisk.  Separate 3 Eggs (put Egg whites in a glass blow then set aside in fridge while making the filling.  Gently mix yolks into the Milk and pour mixture into the saucepan.  Turn pan onto medium heat stirring constantly with the whisk until the sauce begins to boil.  Boil for one minute, remove mixture from the stove.  Add 2 tablespoons Butter and 1 teaspoon of Vanilla.  Cool mixture to room temperature.  Stirring occasionally will prevent a top layer of film from forming and will help the mixture to cool faster. 

Preheat oven to 425 degrees.

Peanut Butter Crumbles
1/4 cup Confectioner’s Sugar
1/2 cup Peanut Butter

Mix the Confectioner’s Sugar and Peanut Butter together with a fork until crumbles form.  Cover bottom of prepared crust with the crumbles.  Reserve about 4 tablespoons for the top of the pie.  Once the pudding mixture has cooled, pour the pudding over the Peanut Butter crumbles in the bottom of the pie crust.  Now it is time to make the Meringue.

Meringue
3 Egg Whites (chilled in a glass bowl)
1/3 cup Sugar

Mix Egg White on medium–high speed with a mixer.  Add Sugar to Egg Whites one tablespoon at a time and continue beating until soft peaks form.  Spread Meringue over the filling with a rubber scraper.  Make sure that the crust is touched by the Meringue on all sides.  Take Scraper and make little spikes in the Meringue.  The spikes will hold the remaining Peanut Butter Crumbles in place on top of the pie.  Sprinkle the reserved Peanut Butter Crumbles over the Meringue. 

Place the pie in a 425 degree oven for 5 minutes or top has become lightly browned.  Cool at room temperature away from drafts.  Once cooled, refrigerate.

Monday, June 6, 2011

Village Pasta Salads

Original Recipe from:  Kay Johnson-Tomblin, enhanced by Pamela Tomblin-Schultheis

Most everyone I know has a pasta salad recipe that is very similar to everyone else’s recipe.  The differences come about by the type of pasta made and the variety of ingredients.  How you make the salad “yours”, your version.  I started making the basic pasta salad during the 1980’s.  Over the years I made a couple changes, but my daughter, Pam, has taken the salad to the next level and hers is the best I ever eaten.  It is a wonderful feeling when the next generation takes a family recipe and, with a few changes, makes it their own.  Tap in to that spirit when you are cooking, you may find the next “best” version.  Enjoy!


Basic Pasta Salad

1 pound Thin Spaghetti or Rotini Noodles (cooked as directed)
1/2 jar (McCormick or Durkee) Salad Seasoning
2 large Tomatoes, chopped
1 small Onion, chopped (optional)
1 Green Pepper, chopped (optional)
1 can Mushrooms, chopped (optional)
8 ounces Italian Salad Dressing

Cook pasta, drain and rinse in cold water (cold water stops the cooking process). 

In a large salad bowl add Salad Seasoning to the pasta, toss to coat pasta.  Add vegetables and Mushrooms, toss to mix.  Add Italian Salad Dressing, toss again.  Chill for at least 30 minutes serving.

Other Optional Ingredients:  Black Olives, Zucchini, Broccoli

Pam’s Pasta Salad

1 pound Rotini Noodles (cooked as directed)
1/2 jar (McCormick or Durkee) Salad Seasoning
2 large Tomatoes, chopped
1 Cucumber, chopped
4-6 ounces Cheese, small cubes
4-6 ounces Hard Salami, chopped
8 ounces Italian Salad Dressing

Mix as directed above.

Note:  You may want to increase the amount of Italian Salad Dressing by an additional 2-4 ounces depending on how moist you like your salad.